Entering Incident Reports
The input fields on the left side of the screen are user-definable. During database setup, you define what fields appear on the screen, what they are called, and what order they appear in. See Designing your Input Form for a description of the available fields.
Fields that are defined as Investigator Only will not be visible or editable when an Operator is logged in.
Unassigned IS NOT the same as "No".
Many of the fields are pick lists, indicated by a down arrow on the right. These fields only allow you to choose one of the predefined answers; you cannot enter your own text.
Every pick list has a default value, usually called "<Unassigned>". Unassigned means "I don't know", or "the value has not been entered yet". If the correct answer is "No", always select "No" specifically.
Example: There is a phrase on the Big Picture report that says something like Patient safety impact was evaluated for 984 (80%) of incidents. For these incidents, the average severity of patient outcome was 1.31 This phrase is based on the What was the actual effect on the patient? on the input form. Suppose you have 100 incident reports. 5 had a serious impact on the patient, and you record those as having severity 3. The other 95 might be a mix of "I don't know" and "No effect". Suppose you left all 95 of them unassigned. The summary phrase would say:
Patient safety impact was evaluated for 5 (5%) of incidents. For these incidents, the average severity of patient outcome was 3.00.
This gives the false impression that a) you have very serious problems, and b) you are not investigating them.
Incident Details - Edit Controls
|
|
Add (or the Insert key) appends a new, blank incident report. |
|
|
The Post and Undo buttons are enabled only if you have made changes to an incident report but haven't saved them yet. Post saves the changes; Undo cancels them. Changes are saved automatically when you close the input form, or when you scroll to a different incident report. |
|
|
Delete (or the Delete key) deletes the current incident report. |
|
|
Closing an incident populates the current date in the Date Closed field on the Incident Tracking Form. Closed incidents may not be edited, although they may be reopened. |
|
|
Closed incidents may be reopened with this button, which clears the date in the Date Closed field. |
|
|
The "VCR" buttons scroll to the first, previous, next, or last incident report. Incidents are sorted by Incident Number (automatically assigned by the program, reflecting the order in which reports were entered), unless you use Filter to change the sort order. |
|
|
Are you an investigator, and only want to see the incidents assigned to you? Are you a manager, and want to see only open incidents that haven't been assigned to an investigator? Do you want to scroll through the incidents in date order instead of entry order? If so, use a Filter (see Filtering to show only "your" incidents). |
|
|
Find shows a pop-up list if incidents -- including incident number, reference number, patient ID, date reported, and date closed -- and lets you go directly to a specific incident. See Finding a specific incident. |
|
|
You may either print the current incident directly by clicking on the Print button, or you may view a summary of the current incident by clicking on the Print Preview button. There is a Save As button on the Print Preview, which allows you to save the summary as an HTML file. |
|
|
Back closes the Incident Editor and returns to the main screen. |


To Enter Objects into the Incident
In Incident Tracking an object is an external file, represented as a link or an icon, that can be added to the text report for an incident. The object can be created from within ITRAK or inserted into ITRAK from a directory.

NOTE: Adding objects to the text report increases the size of the ITRAK database, which can cause the module to crash. Data Innovations support may have to remove object(s) to decrease the size of the database, and this may result in data loss.
To add objects to the incident:
- From the Incident Details window, find the FreeForm text description row.
- Click Show in larger popup window (has edit controls).
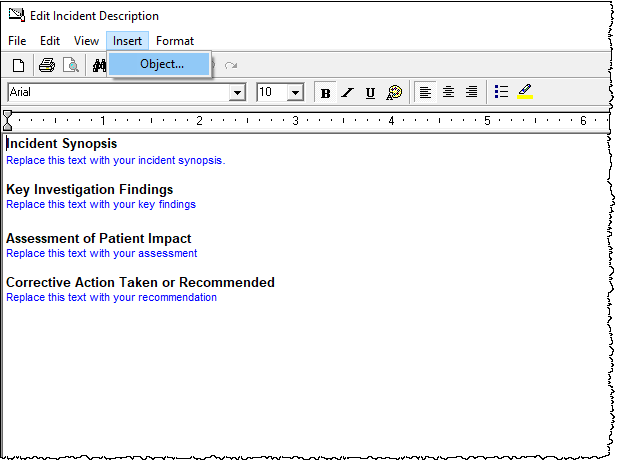
- From the Edit Incident Description window, place your cursor in the text file.
- Open the Insert menu and select Object.
- From the Insert Object dialog, click Create New to create a new object by selecting from the list of software installed on your system or click Create from File to browse to an existing file.
- Click OK. The object is added to the incident.
From within the text report, you can double-click the icon to open and view the object.
Insert Object dialog
Create New
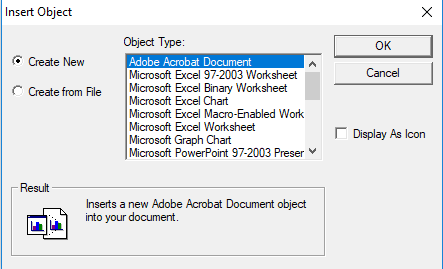
Click Create New to view a list of software installed on your system. Select a software package to open it and create a new file that can be inserted as an object into the text report.
Click Display As Icon for the object to use the file type icon.
Create from File
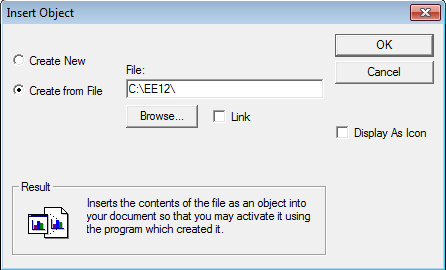
Click Create from File to browse to a file. You can insert the file into the text report as a link or as the file type icon.